
An example of Lens Flare.
Shooting in direct sunlight can cause many problems. High contrast, blown out highlights, lens flare, and overly saturated colors can all reslt from shooting in the sun. Subjects can also squint while posing, whih causes for some lesser quality pictures.
One way to solve these problems is to shoot in the shade, under a tree, for example. With portraits and other "portable" photos, this is the quicest solution. If moving the subject is not possible, however, you instead can move. This can give you better light, and a more interesting shot if you use a less "typical" angle. Another simple solution is to make your on shade. You can use your body, a cardboard sheet, an umbrella, or a reflector to do this.

Using the sunlight to their advantage here, by having an ineteresting angle in their picture.
Instead of taking away light, it is also possible to help solve these problems by adding light. You can use a fill-in flash to even out the subject's shadows. Even though it is more common to shoot with the sun behind you (the photgrapher), you can shoot into the sun for a nice shot, especially if you have a good fill-in flash. Another way to even out dark shadows is to use a reflector (similar to in low-light situations).

A diagram showing how lens flare is caused.
Lens Flare is an extremely common problem when shooting in direct sunlight. It is caused by "non image-forming light" entering the lens and hitting the film. It reflects between the lenses of the camera and refracts before hitting the film. Luckily, there is an easy way to combat this- a lens hood. This is an attachment that goes on the end of your camera which helps to block out the additional light that causes flare. Lens hoods come in a regular conical (lamp shade) shape, or in a petal (flower, tulip, etc.) shape. If you don't have one, it's easy enough to make your own out of cardboard, or just use your hand.

A lens with and without a lens hood (shown here is a petal hood).
Another way to reduce flare is in the composition of the photo. If you have something inbetween the camera and the light source (like the tree here), this can help reduce flare, even if that object doesn't appear in the image intself.

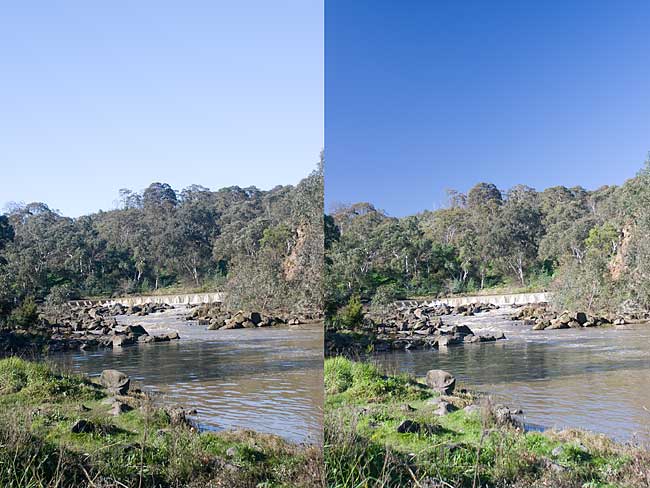
This tree helps block the sunlight and therefore reduces flare.
Also, you can use a filter to help shooting in direct sunlight. Use a polarizing filter or a Neutral Density (ND) filter. These both help to reduce the amount of light that gets into your pictures, which then gives you more control over your aperture and shutter speed. Polarizing flters can also affect the colors of the shot, which can be a bonus or a drawback depending on the effect you're going for.
A picture shot with (Left) and without (Right) a Polarizing Filter.
Metering in direct sunlight is also hard to do. You can either choose to spot-meter the main subject of the scene you're shooting, or you can alternatively choose a more neutrally lit part of the frame- hopefully then the darks and lights of the photo will turn out relativel well. You can also take multiple shots of the same scene with different metering and choose the best image later.
Also, shooting at different times of day can affect your shot. Shooting around dawn and dusk (normally about an hour after dawn and before dusk) can give beatiful shots with nice colors of light, as well as a better angle of light for your purposes.
Finally, if all else fails, use the bright sunlight against itself. Sillhouete shots can be gorgeous, and are easy to do in bright sunlight!

Sources:
http://www.cambridgeincolour.com/tutorials/lens-flare.htm
http://en.wikipedia.org/wiki/Lens_hood
http://digital-photography-school.com/blog/how-to-shoot-in-direct-sunlight/
(Additional Images)
http://www.dimagemaker.com/ktml2/images/uploads/photo/polar/b.jpg
 An example of Lens Flare.
Shooting in direct sunlight can cause many problems. High contrast, blown out highlights, lens flare, and overly saturated colors can all reslt from shooting in the sun. Subjects can also squint while posing, whih causes for some lesser quality pictures.
One way to solve these problems is to shoot in the shade, under a tree, for example. With portraits and other "portable" photos, this is the quicest solution. If moving the subject is not possible, however, you instead can move. This can give you better light, and a more interesting shot if you use a less "typical" angle. Another simple solution is to make your on shade. You can use your body, a cardboard sheet, an umbrella, or a reflector to do this.
An example of Lens Flare.
Shooting in direct sunlight can cause many problems. High contrast, blown out highlights, lens flare, and overly saturated colors can all reslt from shooting in the sun. Subjects can also squint while posing, whih causes for some lesser quality pictures.
One way to solve these problems is to shoot in the shade, under a tree, for example. With portraits and other "portable" photos, this is the quicest solution. If moving the subject is not possible, however, you instead can move. This can give you better light, and a more interesting shot if you use a less "typical" angle. Another simple solution is to make your on shade. You can use your body, a cardboard sheet, an umbrella, or a reflector to do this.
 Using the sunlight to their advantage here, by having an ineteresting angle in their picture.
Instead of taking away light, it is also possible to help solve these problems by adding light. You can use a fill-in flash to even out the subject's shadows. Even though it is more common to shoot with the sun behind you (the photgrapher), you can shoot into the sun for a nice shot, especially if you have a good fill-in flash. Another way to even out dark shadows is to use a reflector (similar to in low-light situations).
Using the sunlight to their advantage here, by having an ineteresting angle in their picture.
Instead of taking away light, it is also possible to help solve these problems by adding light. You can use a fill-in flash to even out the subject's shadows. Even though it is more common to shoot with the sun behind you (the photgrapher), you can shoot into the sun for a nice shot, especially if you have a good fill-in flash. Another way to even out dark shadows is to use a reflector (similar to in low-light situations).
 A diagram showing how lens flare is caused.
Lens Flare is an extremely common problem when shooting in direct sunlight. It is caused by "non image-forming light" entering the lens and hitting the film. It reflects between the lenses of the camera and refracts before hitting the film. Luckily, there is an easy way to combat this- a lens hood. This is an attachment that goes on the end of your camera which helps to block out the additional light that causes flare. Lens hoods come in a regular conical (lamp shade) shape, or in a petal (flower, tulip, etc.) shape. If you don't have one, it's easy enough to make your own out of cardboard, or just use your hand.
A diagram showing how lens flare is caused.
Lens Flare is an extremely common problem when shooting in direct sunlight. It is caused by "non image-forming light" entering the lens and hitting the film. It reflects between the lenses of the camera and refracts before hitting the film. Luckily, there is an easy way to combat this- a lens hood. This is an attachment that goes on the end of your camera which helps to block out the additional light that causes flare. Lens hoods come in a regular conical (lamp shade) shape, or in a petal (flower, tulip, etc.) shape. If you don't have one, it's easy enough to make your own out of cardboard, or just use your hand.
 A lens with and without a lens hood (shown here is a petal hood).
Another way to reduce flare is in the composition of the photo. If you have something inbetween the camera and the light source (like the tree here), this can help reduce flare, even if that object doesn't appear in the image intself.
A lens with and without a lens hood (shown here is a petal hood).
Another way to reduce flare is in the composition of the photo. If you have something inbetween the camera and the light source (like the tree here), this can help reduce flare, even if that object doesn't appear in the image intself.
 This tree helps block the sunlight and therefore reduces flare.
Also, you can use a filter to help shooting in direct sunlight. Use a polarizing filter or a Neutral Density (ND) filter. These both help to reduce the amount of light that gets into your pictures, which then gives you more control over your aperture and shutter speed. Polarizing flters can also affect the colors of the shot, which can be a bonus or a drawback depending on the effect you're going for.
This tree helps block the sunlight and therefore reduces flare.
Also, you can use a filter to help shooting in direct sunlight. Use a polarizing filter or a Neutral Density (ND) filter. These both help to reduce the amount of light that gets into your pictures, which then gives you more control over your aperture and shutter speed. Polarizing flters can also affect the colors of the shot, which can be a bonus or a drawback depending on the effect you're going for.
 Sources:
http://www.cambridgeincolour.com/tutorials/lens-flare.htm
http://en.wikipedia.org/wiki/Lens_hood
http://digital-photography-school.com/blog/how-to-shoot-in-direct-sunlight/
(Additional Images)
http://www.dimagemaker.com/ktml2/images/uploads/photo/polar/b.jpg
Sources:
http://www.cambridgeincolour.com/tutorials/lens-flare.htm
http://en.wikipedia.org/wiki/Lens_hood
http://digital-photography-school.com/blog/how-to-shoot-in-direct-sunlight/
(Additional Images)
http://www.dimagemaker.com/ktml2/images/uploads/photo/polar/b.jpg


 Then, instead of doing more failed full prints, I did a test strip to fidn the right time for these settings.
 I did my A3 print at these settings, with the time doubled to account for the size.


 Then I did an A3 print at 52 seconds. (aperture and filter the same)
 This was too light, so I did a test strip with more time.
Aperture- 5.6
Filter- 3
Time- 70-120
This was too light, so I did a test strip with more time.
Aperture- 5.6
Filter- 3
Time- 70-120


 I then did another test strip at higher times, since the previous was too dark.


