Dave Beckerman:


Dave Beckerman is a self-taught photographer who sells black-and-white film photos he took of New York City. He had his first photo lab at 15 and has been doing photography for about 20 years since. He was a programmer until he decided to try his hand at professional photography and now has his own website.
I chose thsi image because I love how the dark becnhes contrast with the light sky. It is relevant to the project because the shadows are very dark and defined and really bring out the texture of the benches.
[ from http://www.davebeckerman.com/ ]
Keith Barraclough:
Keith grew up all over the world, as the child of a US diplomat. He is now based out of Washington, DC, taking commission, stock, corporate, advertizing, and editorial photography to the US and internationally. He prefers to let a scene "happen" rather than setting it up, because he says if it doesn't feel natural it's just not right.
I chose this image because the shadow is very dramatic and gives an interesting juxtaposition of moods, considering the rather whimsical subject matter. It relates to the project because it is very hard lighting, which gives it a serious feeling, whereas if it were soft lighting the scene would be very happy and cheerful.[from www.keithbarraclough.com ]
Ansel Adams:
 Ansel Adams had a rather dysfunctional family. His family was quite poor after the California earthquake and fire, and his father never managed to regain the fortune, his mother nagging his father all the while for it. He was also ostracized at school, but all this just encouraged his love of nature. He became a pianist for a long period of time (more than 12 years), giving him the dedication and discipline he then turned to photography. He began a prosperous photographic career as a photographer of the Sierra Nevada and later a well known nature photographer. He still, however, remained broke. He was known for his technical expertise and furious dedication. Born in 1902, he died in 1984 a legend.
Ansel Adams had a rather dysfunctional family. His family was quite poor after the California earthquake and fire, and his father never managed to regain the fortune, his mother nagging his father all the while for it. He was also ostracized at school, but all this just encouraged his love of nature. He became a pianist for a long period of time (more than 12 years), giving him the dedication and discipline he then turned to photography. He began a prosperous photographic career as a photographer of the Sierra Nevada and later a well known nature photographer. He still, however, remained broke. He was known for his technical expertise and furious dedication. Born in 1902, he died in 1984 a legend.I chose this image because I love the sharp contrast in the grooves of the sand coming from the bright sun. I also love the different levels he portrays here, This is relelvant because it is a hard lit photograph as well as a landscape.
[from www.anseladams.com ]
 This picture is softly lit because there is hardly any shadows, minimizing all wrinkles. Soft lighting is used for a natural look. It conveys a happy, cheerful mood, and due to its blemish minimizing effects and positive feeling, is generally used for glamor shots.
 This is an example of hard light, because the difference between light and shadow is very large. Here an angry or offended feeling is conveyed because of the model's facial expression plus the lighting.
Three Point Lighting:
This is an example of hard light, because the difference between light and shadow is very large. Here an angry or offended feeling is conveyed because of the model's facial expression plus the lighting.
Three Point Lighting: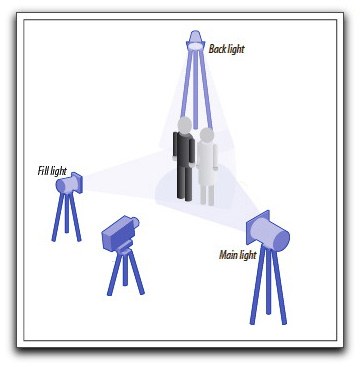
 My negatives were very dark, so it was hard to get my contact sheet, but I eventually managed by opening up the aperture all the way and adding more and more time.
Aperture: 2.8
Filter: 0
Time: 48 seconds
Landscape 1
My negatives were very dark, so it was hard to get my contact sheet, but I eventually managed by opening up the aperture all the way and adding more and more time.
Aperture: 2.8
Filter: 0
Time: 48 seconds
Landscape 1 I kept adding time, eventually doing a full print at 60.
Aperture: 2.8
Filter: 0
Time: 60 seconds
I kept adding time, eventually doing a full print at 60.
Aperture: 2.8
Filter: 0
Time: 60 seconds
 I then continued adding time, since the print was still too light, but otherwise keeping the other settings the same.
Aperture: 2.8
FIlter: 0
Time: 63, 66, 69, 72, 75 seconds (right to left)
I then continued adding time, since the print was still too light, but otherwise keeping the other settings the same.
Aperture: 2.8
FIlter: 0
Time: 63, 66, 69, 72, 75 seconds (right to left)
 I eventually did a final print at 105 seconds.


 Next I tried a full print at 15 seconds.
Aperture: 4
Filter: 0
Time: 15 seconds
Next I tried a full print at 15 seconds.
Aperture: 4
Filter: 0
Time: 15 seconds
 The previous full print seemed a bit too dark at the bottom at 15 seconds, so I reduced the time to 13 seconds, leaving the rest of the settings the same. This fixed the problem, so I left that as my final print.
 To begin, I did this test strip at 13, 14, 15, and 16 seconds, and left the rest of the settings the same as the contact sheet.
Aperture: 4
Filter: 0
Time: 13, 14, 15, 16 seconds.
To begin, I did this test strip at 13, 14, 15, and 16 seconds, and left the rest of the settings the same as the contact sheet.
Aperture: 4
Filter: 0
Time: 13, 14, 15, 16 seconds. I then did my full print at 15 seconds. It initially seemed a bit dark like the chemical print, so I tried another full print at 13 seconds to compare. I decided on the 15 second print as my final.
[Above]
Aperture: 4
Filter: 0
Time: 13 seconds
[Below, final print]
Aperture: 4
Filter: 0
Time: 15 seconds
I then did my full print at 15 seconds. It initially seemed a bit dark like the chemical print, so I tried another full print at 13 seconds to compare. I decided on the 15 second print as my final.
[Above]
Aperture: 4
Filter: 0
Time: 13 seconds
[Below, final print]
Aperture: 4
Filter: 0
Time: 15 seconds


