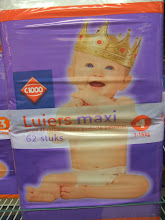
Soft light is all-encompassing light that has soft-edged shadows, if any. It has the effect of "wrapping around" the object in question. A light source can be made "softer" if it is either closer to the subject or larger. It comes from a reflected or a broad source and is often indirect light.
Soft light is used to eliminate or reduce existing shadows, give a more youthful appearance by minimizing wrinkles, and make a light source seem natural.
Naturally, soft light can come from cloud cover or shade (under a tree, for example), since the sunlight is reflected off of the clouds or under other objects to produce less heavy shadows.
Soft light can create a calm, natural, or serene scene.
 This picture is softly lit because there is hardly any shadows, minimizing all wrinkles. Soft lighting is used for a natural look. It conveys a happy, cheerful mood, and due to its blemish minimizing effects and positive feeling, is generally used for glamor shots.
Hard Light:
Hard light has very defined shadows, with less transition between light and shadow, giving a dramatic effect. It is produced more effectively when the rays of light are more parallel to each other, instead of rays from a mutual center point. Hard light also defines the texture and detail of an object.
Hard light doesn't necessarily occur naturally, since even the sun's rays aren't parallel to each other, although in direct sunlight on a cloudless day the shadows are more defined.
Hard light conveys an angry, agressive, scary, ominous, or night-time mood generally.
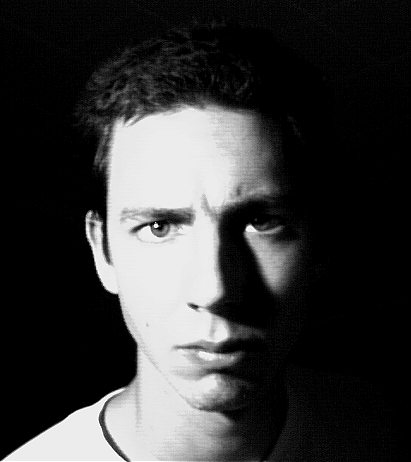 This is an example of hard light, because the difference between light and shadow is very large. Here an angry or offended feeling is conveyed because of the model's facial expression plus the lighting.
Three Point Lighting:
This is an example of hard light, because the difference between light and shadow is very large. Here an angry or offended feeling is conveyed because of the model's facial expression plus the lighting.
Three Point Lighting:Three point lighting consists of light coming from three different sources and/or angles- the Key Light, Fill Light, and Rim Light (aka the back light).
To achieve 3-point lighting, one must begin with no natural light. You then begin with the Key Light, which is the main source of light, standing in for the natural light source. It should come from above, from 15 to 45 degrees to the side of the camera. It should then also hit the subject 15-45 degrees above where the camera does. The key light should be brighter than all of the other lights.
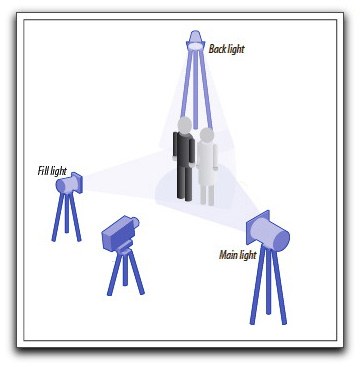
After you set up your key lights, you should add your Fill Lights. These soften the light of the Key Light, as well as lighting other parts of the subject, making more of them visible. If the Key Light is the sun, the Fill Lights are other light sources, such as reflection from the clouds, or a lamp, for example, depending on where the scene is supposed to be "set." There can be more than 1 fill light on a set. The Fill Light should normally be placed about opposite from the Key Light, but not exactly. It can be at the subjects height, but still lower than the Key Light. Fill Lights should not exceed half the brightness of the Key Light, since this is the secondary source of light. If using more than 1 Fill Light, the total amount of light from them should'nt exceed half of the Key's brightness either. The Fill Light's brightness can be changed to make the scene more shadowy, for example, or brighter. Fill Lights' color can also be changed to mimic the color of the light that would be reflected on the subject (for example, the light coming from below, reflected off the "grass," would be a different color from the light from higher above, from the "clouds.")
Lastly come the Rim Lights. They are set behind the subject to set them off from the background by creating a rim of light around them (hence the name). The rim light should be adjusted until it creates a clear and bright outline of the subject. It can be altered to however bright or dull you want the highlight of your subject to be. It should cast shadows, and many times only lights the top and/or side of a subject and doesn't affect the background.
Sources:
Photo Sources:
http://www.thedigitalstory.com/blog/img/photos/diy_studio_lighting.jpg

 My negatives were very dark, so it was hard to get my contact sheet, but I eventually managed by opening up the aperture all the way and adding more and more time.
Aperture: 2.8
Filter: 0
Time: 48 seconds
Landscape 1
My negatives were very dark, so it was hard to get my contact sheet, but I eventually managed by opening up the aperture all the way and adding more and more time.
Aperture: 2.8
Filter: 0
Time: 48 seconds
Landscape 1 I kept adding time, eventually doing a full print at 60.
Aperture: 2.8
Filter: 0
Time: 60 seconds
I kept adding time, eventually doing a full print at 60.
Aperture: 2.8
Filter: 0
Time: 60 seconds
 I then continued adding time, since the print was still too light, but otherwise keeping the other settings the same.
Aperture: 2.8
FIlter: 0
Time: 63, 66, 69, 72, 75 seconds (right to left)
I then continued adding time, since the print was still too light, but otherwise keeping the other settings the same.
Aperture: 2.8
FIlter: 0
Time: 63, 66, 69, 72, 75 seconds (right to left)
 I eventually did a final print at 105 seconds.


 Next I tried a full print at 15 seconds.
Aperture: 4
Filter: 0
Time: 15 seconds
Next I tried a full print at 15 seconds.
Aperture: 4
Filter: 0
Time: 15 seconds
 The previous full print seemed a bit too dark at the bottom at 15 seconds, so I reduced the time to 13 seconds, leaving the rest of the settings the same. This fixed the problem, so I left that as my final print.
 To begin, I did this test strip at 13, 14, 15, and 16 seconds, and left the rest of the settings the same as the contact sheet.
Aperture: 4
Filter: 0
Time: 13, 14, 15, 16 seconds.
To begin, I did this test strip at 13, 14, 15, and 16 seconds, and left the rest of the settings the same as the contact sheet.
Aperture: 4
Filter: 0
Time: 13, 14, 15, 16 seconds. I then did my full print at 15 seconds. It initially seemed a bit dark like the chemical print, so I tried another full print at 13 seconds to compare. I decided on the 15 second print as my final.
[Above]
Aperture: 4
Filter: 0
Time: 13 seconds
[Below, final print]
Aperture: 4
Filter: 0
Time: 15 seconds
I then did my full print at 15 seconds. It initially seemed a bit dark like the chemical print, so I tried another full print at 13 seconds to compare. I decided on the 15 second print as my final.
[Above]
Aperture: 4
Filter: 0
Time: 13 seconds
[Below, final print]
Aperture: 4
Filter: 0
Time: 15 seconds